Brake Modification on Shower Commode Chair
The client uses a T70 shower commode chair for toileting and showering. As he lives alone without careworker support, he needs to operate both brakes by lowering the left lever, which needs to be higher and longer than the original. In 2018, Remap made a similar modification to an identical commode, but the solution found then, albeit solid and durable, was based on a straight bar connecting the two brakes which was in the way of the client backing into his toilet seat. The client wanted to keep the old chair as a reliable backup but was interested in exploring a new solution for his new chair.
In addition, the armrests on the new chair were a bit too “sticky” and hard to remove.
The Challenge
There were multiple challenges with this project. The client wanted to be able to operate the wheelchair by himself, which means positioning it next to his bed, securely engaging both brakes by operating just the left lever, removing the left armrest, and then sliding from the bed onto the wheelchair.
There were also additional requirements. The connecting mechanism between the brakes had to be unintrusive when backing into the toilet seat, and the brake handle needed to be as flush as possible with the commode in order for it to come as close as possible to the bed.
Of course, the brakes needed to be perfectly engaged when the lever is down, and perfectly disengaged when the lever is up.
And everything had to be water proof.
Despite all of these challenges, both the client and the OT were incredibly collaborative! We brainstormed together various solutions and they kindly evaluated at least 3 prototypes before we settled on the final version.
The solution
The solution’s central piece consists of a bent aluminum tube (1) connecting the two brake axles so that turning one solidly turns the other. I achieved this by using two long carriage bolts (2) each secured to the brake handle with a nut (3) and a passing bolt (4). Bolts and nuts are all stainless steel and secured with thread-locker glue.


The left handle was then extended by using an aluminum handle made from a bicycle hook. In addition, to ensure that the brakes stay fully disengaged, I added a soft tension spring which doesn’t significantly increase the force required to operate the brakes but counters the weight of the handle holding it up when the brakes are not in use.
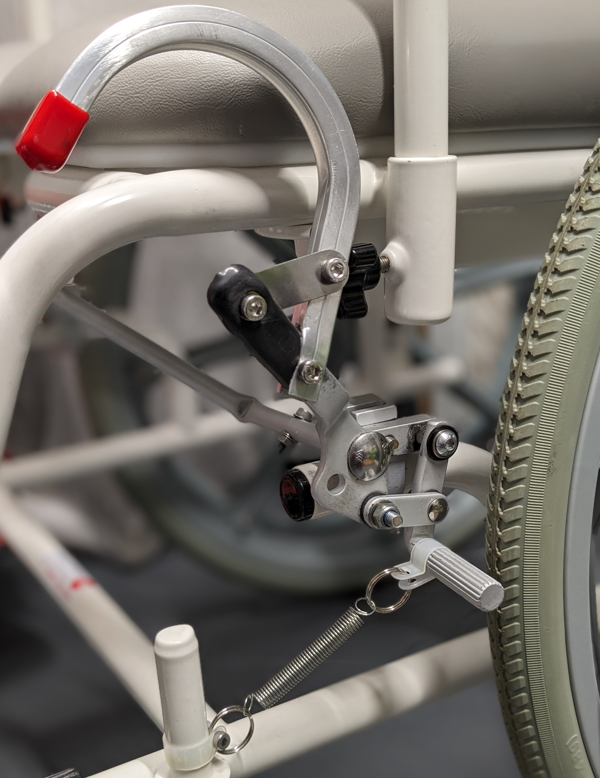

The top-down view below shows the handle after having been reoriented to be as flush as possible with the commode’s seat.

As for the armrest needing to be easier to remove and re-add, the problem was the rubber-to-rubber friction of the commode’s rubberised finish. I resolved it by removing the coating on the lower part of the armrest support and replacing it with anodised paint.
The video below shows the brakes being operated, as well as the left armrest being removed and re-added.
The benefit
The client is now more comfortable with the use of the toilet while feeling the same level of safety that was offered by the old commode, which he can now devote as a backup solution. The client messaged me after he tried the commode for the first time in the presence of the OT, saying: “It was lovely and stable when I was transferring so I feel confident now to do it on my own. Thank you so much.”
- Skills involved:
- Issues Addressed:
- Activities Helped:
- Location:
- Solution: